Overdrives became popular in the late 1930's as roads improved, allowing greater travel distances and higher speeds in motor cars. They reduced engine RPM's by over 30%, resulting in longer engine life and better gas mileage. Packard introduced theirs in 1939 as Econo-Drive. It was mounted at the rear of the transmission, and was controlled by a manual control knob at the bottom of the dash that was pushed in to engage and pulled out to disengage. This manual knob activated a series of electrical relays that made the unit work.
HOW TO ENGAGE ECONO-DRIVE: With the car running and the gears being shifted in the normal way, when approximately 22 mph is reached, a green light to the right of the speedometer will come on. The Econo-Drive may now be engaged by momentarily lifting the foot from the accelerator, then returning it. Econo-Drive will now be engaged, and it will stay engaged as long as the cars speed is maintained above approximately 17 mph.
To shift back into conventional high gear, push the accelerator down hard. To return to Econo-Drive, lift your foot momentarily and Econo-Drive will automatically come back in.
TO LOCK OUT THE SYSTEM: With the car in motion at a speed less than 5 mph, depress the clutch and pull out the dash lockout knob.
We have a 1946 Packard Custom Super 8 with R-9. The unit has never worked. We have only driven the car in town, so it hasn't been a problem. Were now planning to do more open-road motoring, and want the benefit of the lower RPMs on our 356 cid straight 8. We have a '48 with the R-11, and when its on the open road and the overdrive is engaged, its like a fourth gear and the engine seems to loaf as it quietly takes us down the highway.
Before starting repairs on our '46, we located our motors manuals and newsletters and set up our team, then we were ready to start. After studying the manual and before testing, we made sure it was getting current through the system, starting at the sourcethe 30-amp fuse at the starter (It's hot all of the time). Since the unit had been inoperable for years, every contact was cleaned. The fuse was removed and tested and the wire contact ends to it cleaned. Each wire was checked for oxidation and continuity.* This is a positive ground system, so we followed the ground circuit through the switches to the governor then tested for continuity to the solenoid (see wiring diagram for components).
With current going to all components in the circuit, it was time to test the solenoid and governor. We called on our Packard buddy Ron Carpenter to help go beyond the manual for the solenoid testing. The goal is to get the plunger to kick in and out, which activates the overdrive.
TO TEST: With the solenoid off the car, take a 6-volt battery and connect a pigtail to the battery's positive terminal, and then to the case of the solenoid (rubber gloves are recommended). Then take a pigtail from the negative battery terminal to #3 terminal on the solenoid (the numbers are stamped on the solenoid). The plunger will start popping in and out. Then take a pigtail from the negative battery terminal to #4 terminal on the solenoid. This will stop the plunger in the out position. Our solenoid didn't work (the plunger wouldn't move). We called our buddy David Moe, owner of Packard Seattle Company (425-334-7754), to rebuild it. He had a rebuilt one on the shelf and we had it in a week. When it was hooked up and tested, this time it worked.
While we had been waiting for the solenoid, we tested the governor. We removed the cover, cleaned the contacts, then hooked it up to a drill to make sure the sling weights came out. As they spin, they cause a micro switch to close and complete the circuit. The purpose of the governor is to provide a ground for the system. Ours worked fine.
INSTALLING THE SOLENOID:
With everything working, it was now time to install the solenoid. This must be done with the overdrive cable in and the solenoid energized. It has an aluminum adapter plate with an off-set hole that only fits one way. Once you have it in position, mark the plate and unit with a Sharpie, then energize the solenoid to kick out the plunger. To energize (with the solenoid wires hooked up) first ground the governor by running a pigtail from the one terminal on the governor (the one coming from the harness) then run the other end of the pigtail to the transmission. Then ground the solenoid by running a pigtail from the body of the solenoid to the transmission. This will kick out and hold the plunger. With the plunger out, push it into the hole in the overdrive with the adapter plate in the correct position, and tilt the plunger toward the front of the car, then pull and tilt back to lock it in place. This locks the plunger to the pawl. Then bolt up. It seals with an O-ring. The adapter plate has paper gaskets on each side.
While it was still on the rack, it was a good time to check the transmission, overdrive and rear end. They all use 90-weight mineral oil, although in some climates, 140 mineral oil can be used in the overdrive and transmission. Now, with everything buttoned up, it was time for the long-anticipated test drive. I got in and went through the gears. Right around 22 mph, the green light in the speedometer came on. I lifted my foot from the accelerator, then returned it, and we could feel it go into overdrive. The engine became quieter, the car was quieter, and we could feel the reserved torque and horsepower as the old Packard glided down the road. Its obvious why overdrives were so popular well into the '50's. Our '46 is now ready for some touring.
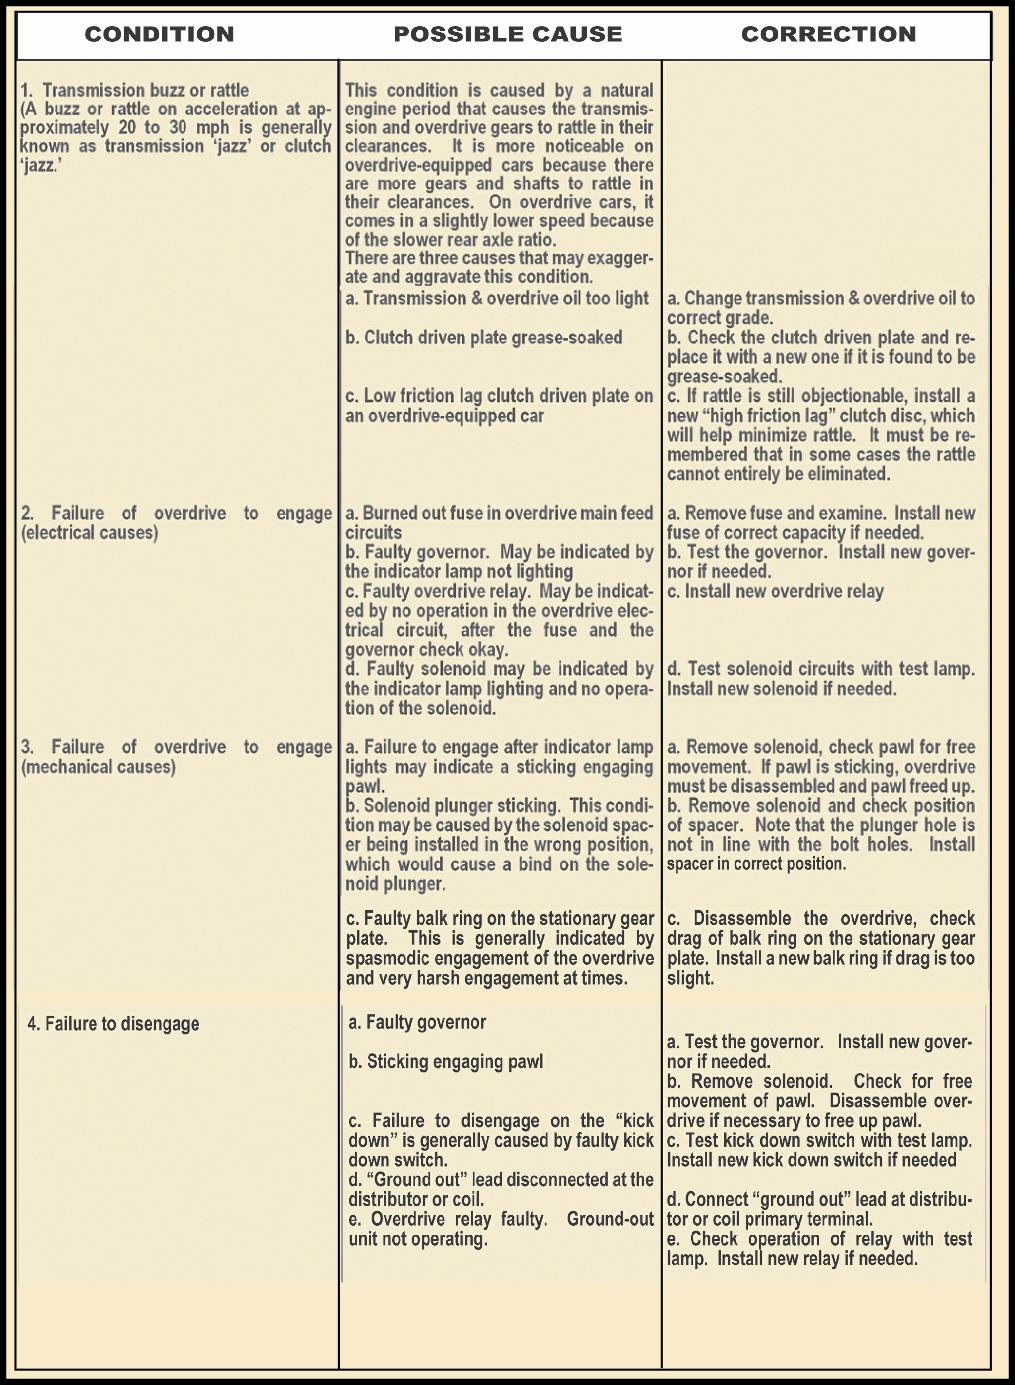
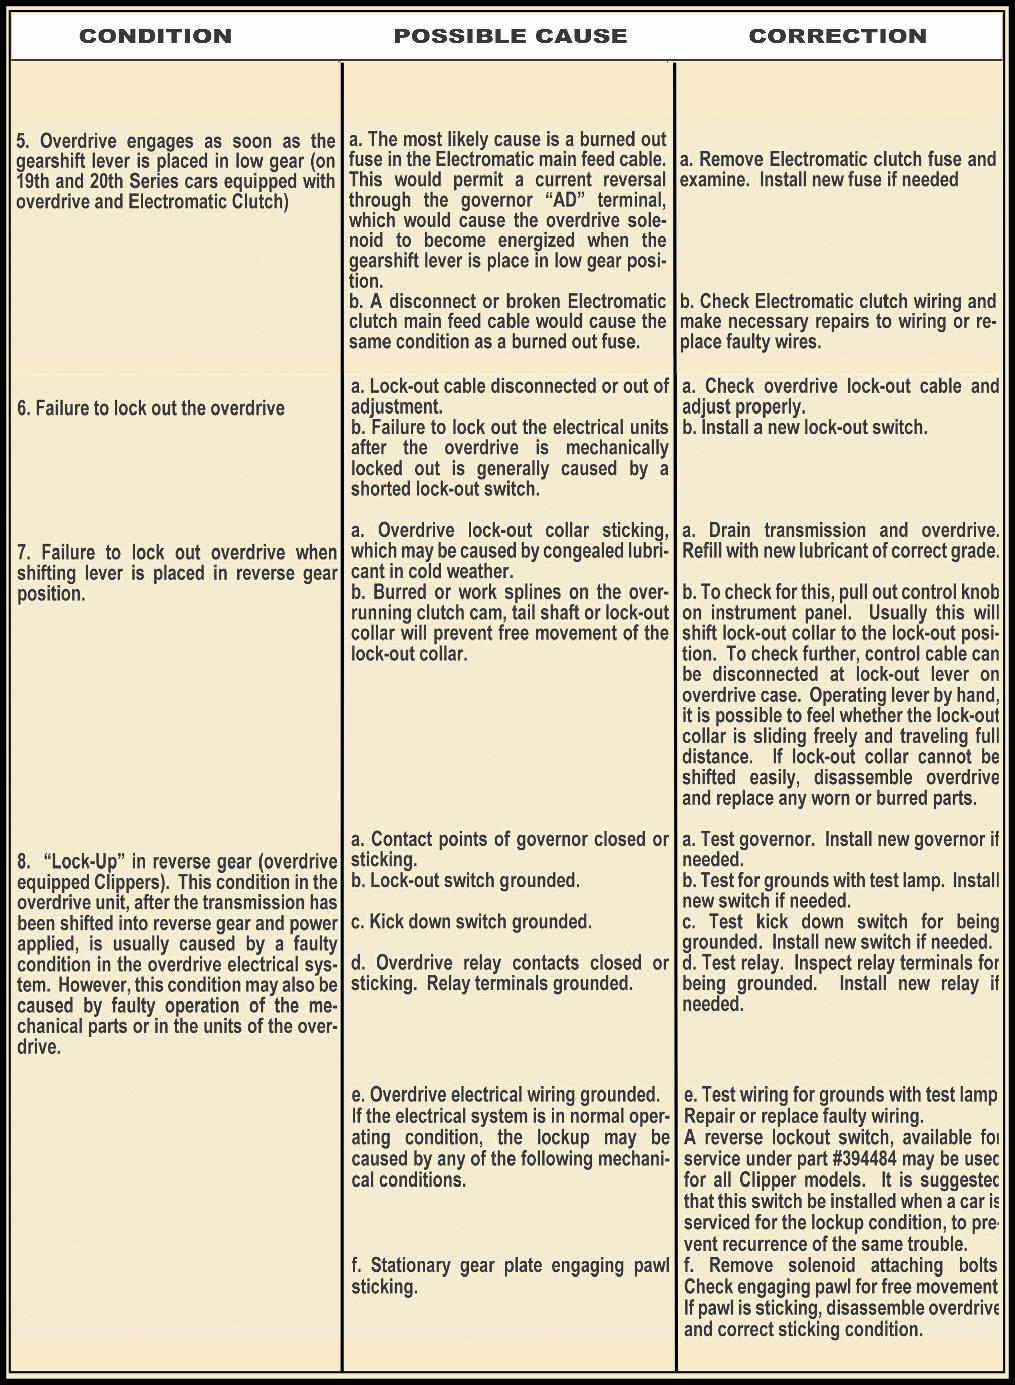
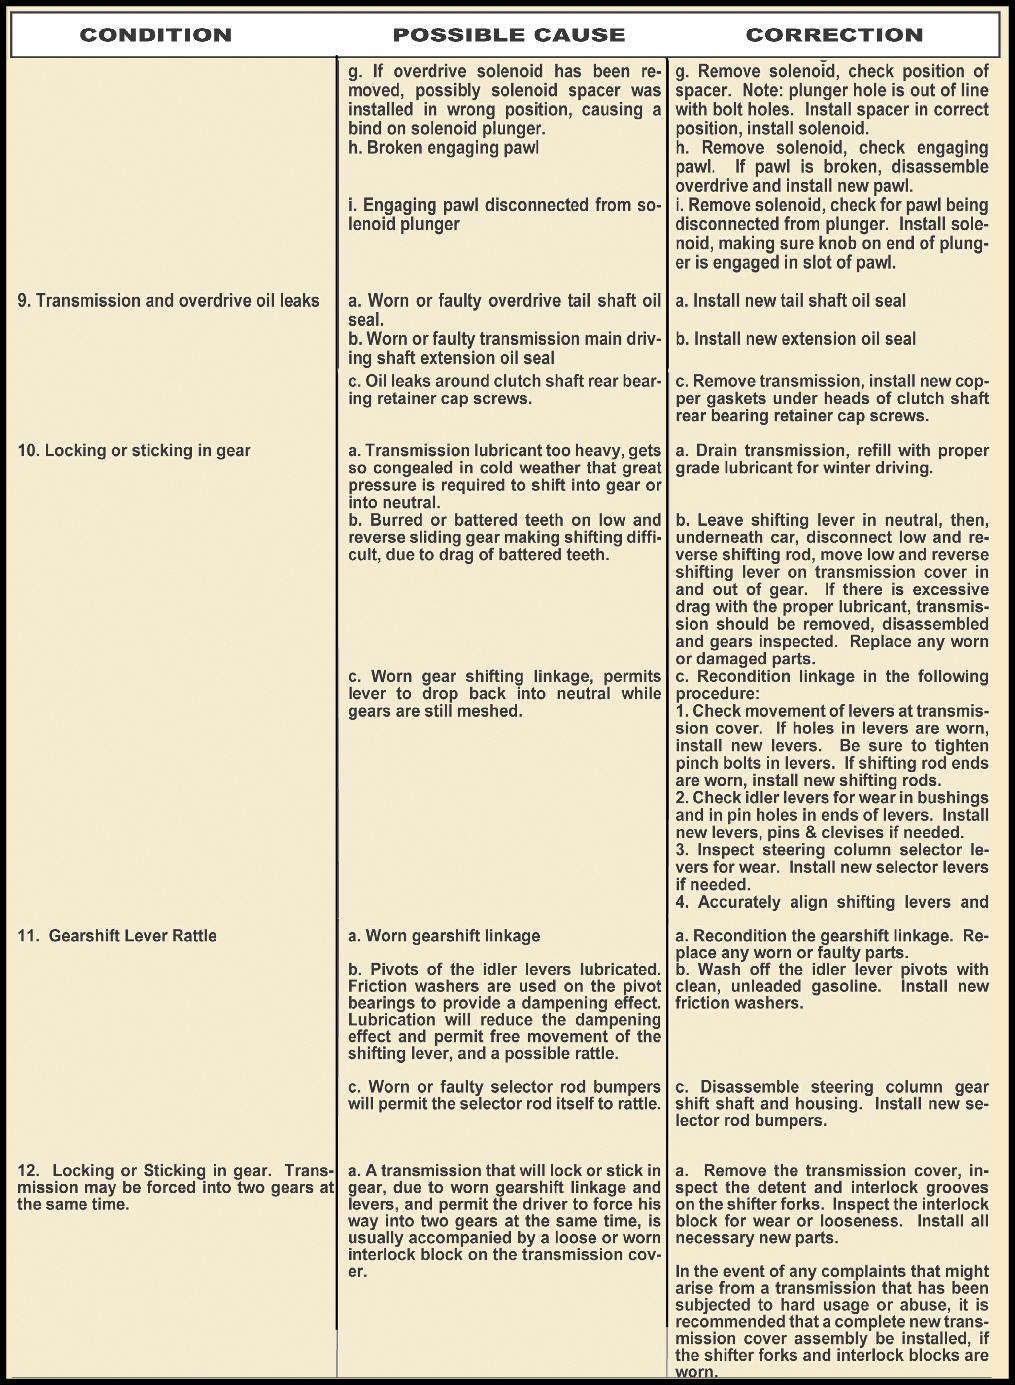
The following charts describe the Conditions that might be found in the R-9, Possible Causes for those conditions, and Corrections that can be made to eliminate the problems. I hope this information helps keep your overdrive operating as it should. Overdrives really let the engine relax, allowing the car to smoothly travel down the road without strain.
i